Spring time is such a hopeful time. I love it right now, watching all the green buds starting to burst open. However, I also know that I've had a lot of problems with insect pests in the past and that for some of my plants this beautiful start is all shot to pieces by the time we get to summer. As an organic gardener, there are loads of natural pesticides to choose from that are safe for kids and pets and biodegrade quickly, causing no long term problems for wildlife.
However, as I've been learning from John Kempf and the Advancing Eco Agriculture Team, there is a better way!
John's regenerative approach is all about setting up a healthy growing system that naturally eliminates pests. It's like us working to keep our bodies fit and healthy to avoid being vulnerable to winter bugs - we eat well, we get exercise. In gardens, it's the same - for vibrant health, plants need to get better nutrition and interact more with the world around them. John explains this really clearly as a four step journey to full health. I definitely recommend checking out the webinar he gives on this, but for those who prefer to read, here's a summary:
So there are four stages of health and four sets of pests. As you help your plants advance from one stage to another, the pests fall away, one by one. Knowing this, you can get out into your garden straight away to see what stage of health your plants are at.
Stage 1 is all about gaining complete photosynthesis in order to stop your plant from accidentally feeding soil based fungal pathogens, such as fusarium and verticillium wilts, which give you yellowing, stunted and wilting plants.
Most plants are only photosynthesising at around 25% of the rate they could be. This means a difference in the type of sugars they produce - at this rate, they produce the type of sugar that attracts fungal pathogens in the soil, such as verticilium and fusarium. Increase the photosynthesis and the plants no longer do this - they produce more of the complex carbohydrates that support beneficial soil life.
The shortfall is due to not having enough of the minerals plants need for photosynthesis - they need Magnesium, Iron, Manganese and Nitrogen. Phosphorous is also important for this stage of health.
Minerals can be added naturally using a liquid seaweed extract, sprayed directly onto the leaves of your plants. For acid loving plants, such as rhododendron and camellia, you can buy special seaweed extracts tailored for this type of plant (containing extra iron). If you want to know for sure this is working, photosynthesis levels can be checked using a refractometer - these cost around £20 online. They give a brix reading for your plants, with normal, poor health being at 3-5, whereas with good levels of photosynthesis you will find readings of 12-15 or more.
With level 1 complete, level 2 is now up for grabs:
Stage 2 is about cleansing the sap in your plant of food for some major insect pests - if you have problems with larval pests, aphids or other sap sucking insects then you need help here.
Like stage 1, this stage is also about mineral balance. As well as producing sugars with photosynthesis, plants also make proteins and amino acids, which are vital to their growth and vitality. However, without enough of the right minerals, plants are left with part of the building blocks for amino acids and proteins - the nitrates and ammonium, but can't process them any further, meaning these substances are left floating around in their sap. This is like setting out a buffet for those sap sucking pests as nitrates and ammonium are exactly what they love to eat, so they head straight over to gorge on your plants. Pests here include aphids, leafhoppers, whitefly and spider mites.
The answer is the same as for stage 1 - feed your plants the minerals they need - in this instance it's Magnesium again, along with Sulphur, Molybdenum and Boron. A seaweed spray to leaves should do the trick.
Stage 3 is all about shielding - plants at this stage of health are able to put up shields on the leaf surface to protect themselves from airborne fungal and bacterial pathogens, including mildew, blight and rust.
At this stage, plants have achieved a solid symbiotic relationship with microbes in the soil. They are gaining the vast majority of their nutrition in the form of microbial metabolites. They are getting such good levels of nutrition in fact that they are able to store an excess as lipids - as oils and waxes. These are what make the protective shields on the leaf surface. Expect to see rich, green, glossy leaves. Excess lipids are fed into the soil via the root system to feed microbes.
We can help our plants reach this stage of health by feeding the soil with microbial innoculants. These include home made, well rotted compost, aerated compost tea and proprietary innoculants, which come in either powder or liquid format - both of which can be added to cans of water to simply water into the soil.
You can conduct a fairly simple test at home to give you a bit of an idea of how healthy your soil microbial populations are. This is called the slake test and it tests for soil aggregate stability. If the aggregates (small clumps) are quite stable, this indicates microbes are really active and are busy doing lots of what they do naturally - gluing tiny soil particles together into larger clumps. The more stable these are, the more abundant your microbes must be.
Stage 4 is about increasing production of some of the most complex plant chemicals - secondary metabolites. These are the essential oils, the terpenes, tanins and other substances that the plants use to actively keep themselves and their neighbours healthy. At this stage of health, plants are able to protect themselves from beetles, nematodes and viruses.
To gain this stage of health, plants need the correct microbes to be present in the soil and on plant surfaces above ground too. We can help our plants get to this stage of health by adding microbial innoculants, as for stage 3. In addition, it might be worth trying to source some healthy soil from an equivalent habitat in the wild (woodland/rocky scrub/wetland etc) and using it to make an aerated compost tea. This method enables you to seed your land with microbes that may be missing. Make sure to get the landowner's permission to take some of their soil!
So I will be putting all of this to the test over the coming months and years and will keep you updated. I'm really excited about getting going with this. Dealing with pests in this way completely turns pest control on its head. Instead of looking at pests as a problem to be eliminated, I'm looking forward to looking more carefully at which pests or diseases I have in which areas as it's going to tell me what is wrong with the soil in that part of the garden. Using the four steps above, I'll straight away know what the cure is likely to be and can feel confident that my work is bringing the yard here back up to full health.
Showing posts with label microbes. Show all posts
Showing posts with label microbes. Show all posts
Monday, 18 March 2019

Friday, 21 December 2018
Seeding the Living Soil
I've been getting rather excited about aerated compost teas and am feeling very optimistic that they are going to transform the health of my garden. If you also have problems with a heavy clay soil, you may find this works for you too.

My poor, heavy clay soil is still really struggling, despite it being several years now since we lifted the concrete. All that time under cover has really taken its toll. I've been using no dig methods and have planted good, deep rooting ground cover plants with a view to opening up the soil and generally improving soil structure, yet still, most trees and shrubs I plant out fail to thrive. Over the last couple of years, this has really been starting to get me down. Has this whole reclamation project led me down a dead end? Were my aims to build a thriving wildlife haven and productive garden out of an old concrete covered farmyard completely unrealistic?! Is our soil actually beyond help?
Eek!
However, I'm not one to be defeated. On the contrary, I really love a challenge. So, with renewed vigour, I've been doing my research, trying to find good, ecological ways to bring soil back into good health. Over this last year, I've discovered agro ecology and regenerative agriculture and they've restored my gardening mojo! I feel like I was missing several pieces in the garden-as-ecosystem jigsaw and that the regenerative approach to managing land has filled in a good chunk of those gaps for me.
And they're claiming some amazing results from using their regenerative techniques - higher yields, reduced or eliminated chemical inputs, reduced or eliminated pests and diseases, higher nutritional content, reduced atmospheric carbon dioxide, increased biodiversity, increased drought tolerance, increased depth of topsoil...
So over the last month or so, I've been putting into place the beginning of my new soil improvement plan. The foundation of the regenerative approach is that healthy soil needs healthy populations of micro organisms. Step two - if you like - is that to keep these alive and thriving, you need the ground to be filled with plants (the plants feed the microbes and the microbes feed the plants). I think this has been my problem - my soil - stuck under concrete as it was - has been devoid of these microbes for so long, it is surely really struggling to establish healthy populations again. I've been doing all the things you're meant to do to look after your microbes, yet when there aren't the healthy microbes there to start with, it hasn't really been helping very much.
I suspect this is a problem actually anywhere where you have a really heavy clay soil. Where your soil is getting waterlogged, those healthy supportive microbes can't survive. In fact, waterlogged soils or those that don't have contact with the air are exactly the kinds of environment the bad microbes love - disease causing microbes and those that support problem weeds like creeping thistles. The microbes we want as gardeners need an open, aerated soil - the same conditions that our garden plants want. The good news is that if you can get hold of some of these microbes and seed them into your soil, they will create the kind of open, aerated soil that they and their plant partners love so much. And then you get all those amazing knock on benefits I listed up above about pest control, drought tolerance, carbon sequestration and so on. It's a beautiful win win situation with bonus points for all!
This is what they all say anyhow.
However, I never like to fully believe something until I've tried it myself.
So - to get these supportive microbes into your soil throughout an entire garden, you need to either make a decent compost tea or you need to buy a decent microbial product. I'm going to explain how to make your own compost tea and all the ingredients that make it really effective below. But depending on where you live, you may also be able to find a product on the market that includes the same supplementary ingredients, saving you a lot of bother! But it is certainly cheaper and probably more effective to make your own.
My recipe for compost tea is based on advice from Dan Kittredge from Bionutrient.org, mixed with tips from Elaine Ingham in her book Gardening With Nature and advice from Jeff Lowenfels in Teaming with Microbes. Skip to the end if you want a concise version!
So when you make your compost tea, the first thing you need to know is that it needs aerating. You can't just soak some compost in water and expect these microbes to survive! I use a standard fish tank aerator, with two air stones, submerged in a 15 litre bucket of rainwater. I weight them down to the bottom with rocks.
Rainwater is important - remember chlorinated tap water is designed to kill microbes. You can use tap water if you leave it to stand for a few hours first, but rainwater is best.
Then you need microbes - well rotted, home made compost. I use about 3 cups of compost. If I'm going to be watering this tea onto veg beds or lawn, I use the compost fresh from the compost bin. If I'm making tea for my perennial beds, shrubberies, forest garden or any other areas with perennials and woody plants, I first activate the fungi in the compost as these are really important mature plant partners. I basically add a handful of bran and after a few days you can see lots of fungal hyphae growing all over the compost like thick spiders' webs. This is ready to use. It goes into an old pair of tights, like a giant tea bag, to make it easy to strain out at the end. I stretch them over the top of my bucket with the aerator tubes sticking out underneath like this:

Then you need to add microbe food and habitat. The key microbes you want to feed are the smallest ones - the bacteria and fungi. These form the base of the food chain for all the higher microbes. For bacteria, you add some kind of sugar (1.5 tablespoons) - molasses, honey, apple juice, cane sugar even. I use molasses. Fungi feed on more fibrous materials. I use apple pulp and bran (2 tablespoons). I also add rock dust (1 cup) - this provides minerals for the bacteria and fungi to digest and make available for my plants. I also add liquid humates (2 tsp) - these are stable organic compounds, which can't be digested any further by microbes, but which are incredibly complex in structure and so provide habitat for these tiny creatures. They are also really good at cleaning up the soil and water by locking any toxins away.

So this mix bubbles away for a day and a half and then I dilute it down - roughly 1 litre of compost tea to a 40 litre trug of rainwater - and I water this all over my land - beds, paths and all. My 15 litre bucket of aerated compost tea was enough for our three quarters of an acre.

For a microbially poor soil like mine, or - I would say - any heavily waterlogged clay soils - your soil will really thank you if you apply this once a fortnight for three months. I'll be doing this throughout the spring. Then ease it back to monthly for the next three months.
After that and for any gardens that aren't in too bad a state to start with - you can boost your garden health further by applying this mix three times a year -
1. in spring just before your plants wake up - as a soil drench
2. in spring just after leaves unfurl - as a foliar treatment
3. in autumn after leaf fall - as a soil drench.
So having got this process started, now I wait, hoping to see some of those amazing benefits regenerative farmers are describing! I'm keeping my fingers crossed and will keep you updated.
Compost Tea Recipe
Makes 3 gallons - treats 3/4 acre
3 gallons rainwater
3 cups compost (home made)*
1.5 tbsp molasses (or other sugar)
2 tsp liquid humates
1 cup rock dust
2 tbsp fibrous material - e.g. apple pulp, bran, oatmeal
*for perennial and woody plants, activate compost by adding a handful of bran/oatmeal approx 5 days before brewing the tea. Wait until white fungal strands can be seen before using. Veg beds and lawn need no pre prep of compost.
Brew tea using submerged aerators for 1.5 days.
Dilute to use - roughly 1 litre tea per 40 litre trug (or 1 cup per 10 litre watering can).


My poor, heavy clay soil is still really struggling, despite it being several years now since we lifted the concrete. All that time under cover has really taken its toll. I've been using no dig methods and have planted good, deep rooting ground cover plants with a view to opening up the soil and generally improving soil structure, yet still, most trees and shrubs I plant out fail to thrive. Over the last couple of years, this has really been starting to get me down. Has this whole reclamation project led me down a dead end? Were my aims to build a thriving wildlife haven and productive garden out of an old concrete covered farmyard completely unrealistic?! Is our soil actually beyond help?
Eek!
However, I'm not one to be defeated. On the contrary, I really love a challenge. So, with renewed vigour, I've been doing my research, trying to find good, ecological ways to bring soil back into good health. Over this last year, I've discovered agro ecology and regenerative agriculture and they've restored my gardening mojo! I feel like I was missing several pieces in the garden-as-ecosystem jigsaw and that the regenerative approach to managing land has filled in a good chunk of those gaps for me.
And they're claiming some amazing results from using their regenerative techniques - higher yields, reduced or eliminated chemical inputs, reduced or eliminated pests and diseases, higher nutritional content, reduced atmospheric carbon dioxide, increased biodiversity, increased drought tolerance, increased depth of topsoil...
So over the last month or so, I've been putting into place the beginning of my new soil improvement plan. The foundation of the regenerative approach is that healthy soil needs healthy populations of micro organisms. Step two - if you like - is that to keep these alive and thriving, you need the ground to be filled with plants (the plants feed the microbes and the microbes feed the plants). I think this has been my problem - my soil - stuck under concrete as it was - has been devoid of these microbes for so long, it is surely really struggling to establish healthy populations again. I've been doing all the things you're meant to do to look after your microbes, yet when there aren't the healthy microbes there to start with, it hasn't really been helping very much.
I suspect this is a problem actually anywhere where you have a really heavy clay soil. Where your soil is getting waterlogged, those healthy supportive microbes can't survive. In fact, waterlogged soils or those that don't have contact with the air are exactly the kinds of environment the bad microbes love - disease causing microbes and those that support problem weeds like creeping thistles. The microbes we want as gardeners need an open, aerated soil - the same conditions that our garden plants want. The good news is that if you can get hold of some of these microbes and seed them into your soil, they will create the kind of open, aerated soil that they and their plant partners love so much. And then you get all those amazing knock on benefits I listed up above about pest control, drought tolerance, carbon sequestration and so on. It's a beautiful win win situation with bonus points for all!
This is what they all say anyhow.
However, I never like to fully believe something until I've tried it myself.
So - to get these supportive microbes into your soil throughout an entire garden, you need to either make a decent compost tea or you need to buy a decent microbial product. I'm going to explain how to make your own compost tea and all the ingredients that make it really effective below. But depending on where you live, you may also be able to find a product on the market that includes the same supplementary ingredients, saving you a lot of bother! But it is certainly cheaper and probably more effective to make your own.
My recipe for compost tea is based on advice from Dan Kittredge from Bionutrient.org, mixed with tips from Elaine Ingham in her book Gardening With Nature and advice from Jeff Lowenfels in Teaming with Microbes. Skip to the end if you want a concise version!
So when you make your compost tea, the first thing you need to know is that it needs aerating. You can't just soak some compost in water and expect these microbes to survive! I use a standard fish tank aerator, with two air stones, submerged in a 15 litre bucket of rainwater. I weight them down to the bottom with rocks.
Rainwater is important - remember chlorinated tap water is designed to kill microbes. You can use tap water if you leave it to stand for a few hours first, but rainwater is best.
Then you need microbes - well rotted, home made compost. I use about 3 cups of compost. If I'm going to be watering this tea onto veg beds or lawn, I use the compost fresh from the compost bin. If I'm making tea for my perennial beds, shrubberies, forest garden or any other areas with perennials and woody plants, I first activate the fungi in the compost as these are really important mature plant partners. I basically add a handful of bran and after a few days you can see lots of fungal hyphae growing all over the compost like thick spiders' webs. This is ready to use. It goes into an old pair of tights, like a giant tea bag, to make it easy to strain out at the end. I stretch them over the top of my bucket with the aerator tubes sticking out underneath like this:
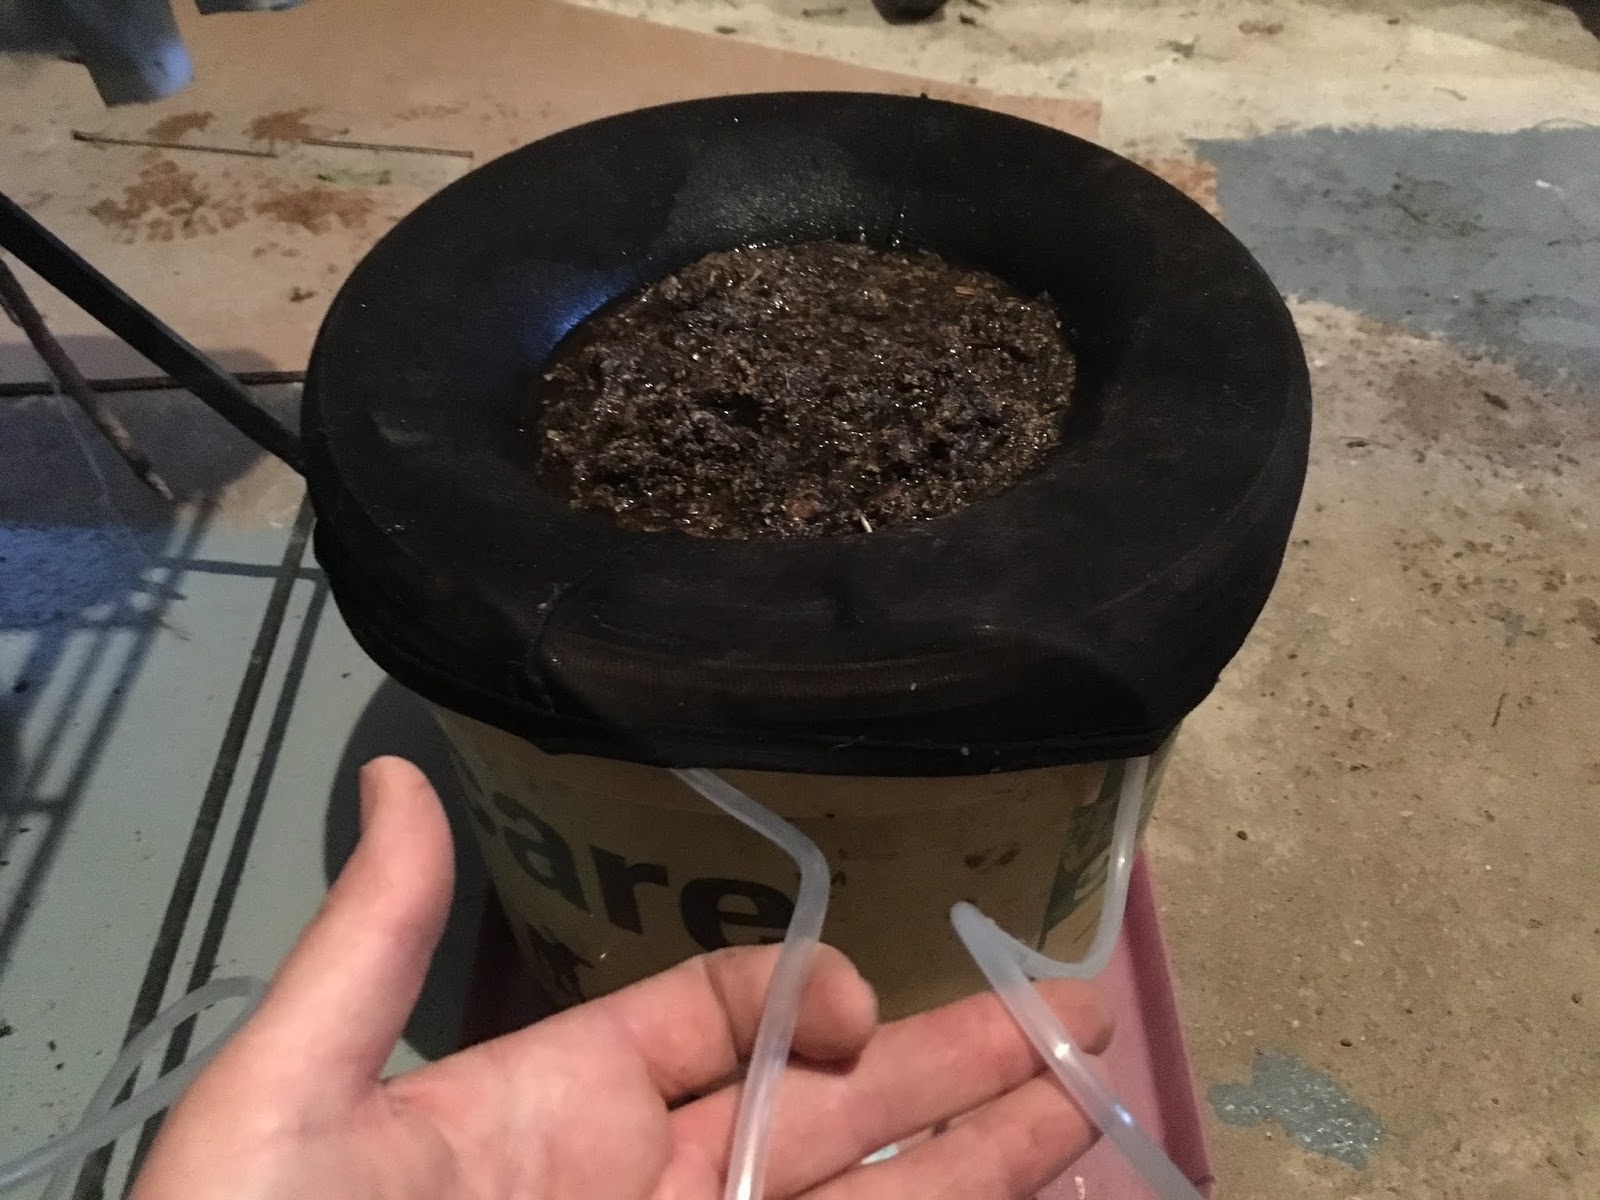
Then you need to add microbe food and habitat. The key microbes you want to feed are the smallest ones - the bacteria and fungi. These form the base of the food chain for all the higher microbes. For bacteria, you add some kind of sugar (1.5 tablespoons) - molasses, honey, apple juice, cane sugar even. I use molasses. Fungi feed on more fibrous materials. I use apple pulp and bran (2 tablespoons). I also add rock dust (1 cup) - this provides minerals for the bacteria and fungi to digest and make available for my plants. I also add liquid humates (2 tsp) - these are stable organic compounds, which can't be digested any further by microbes, but which are incredibly complex in structure and so provide habitat for these tiny creatures. They are also really good at cleaning up the soil and water by locking any toxins away.

So this mix bubbles away for a day and a half and then I dilute it down - roughly 1 litre of compost tea to a 40 litre trug of rainwater - and I water this all over my land - beds, paths and all. My 15 litre bucket of aerated compost tea was enough for our three quarters of an acre.

For a microbially poor soil like mine, or - I would say - any heavily waterlogged clay soils - your soil will really thank you if you apply this once a fortnight for three months. I'll be doing this throughout the spring. Then ease it back to monthly for the next three months.
After that and for any gardens that aren't in too bad a state to start with - you can boost your garden health further by applying this mix three times a year -
1. in spring just before your plants wake up - as a soil drench
2. in spring just after leaves unfurl - as a foliar treatment
3. in autumn after leaf fall - as a soil drench.
So having got this process started, now I wait, hoping to see some of those amazing benefits regenerative farmers are describing! I'm keeping my fingers crossed and will keep you updated.
Compost Tea Recipe
Makes 3 gallons - treats 3/4 acre
3 gallons rainwater
3 cups compost (home made)*
1.5 tbsp molasses (or other sugar)
2 tsp liquid humates
1 cup rock dust
2 tbsp fibrous material - e.g. apple pulp, bran, oatmeal
*for perennial and woody plants, activate compost by adding a handful of bran/oatmeal approx 5 days before brewing the tea. Wait until white fungal strands can be seen before using. Veg beds and lawn need no pre prep of compost.
Brew tea using submerged aerators for 1.5 days.
Dilute to use - roughly 1 litre tea per 40 litre trug (or 1 cup per 10 litre watering can).

Tuesday, 4 December 2018
Drought Relief - A Regenerative Gardening Approach
It's currently pouring with rain, so it seems rather odd to be sat here writing about drought relief! But this year we had a really hot, dry summer and plants around here really suffered. So with that in mind, I'm taking measures to improve things for the years to come. And I'm using a biological, regenerative approach.
If you're into organic gardening and haven't come across the regenerative approach, I urge you strongly to find out more! I've been banging on about helping your soil food web, increasing the microbes in your soil for a while, but this year I did a bunch of research, listened to some lectures, read a few books and feel like I've emerged with much better understanding of what's going on between our plants, the soil and the life in the soil. This regenerative approach is not just really helpful to me in the garden, it's also rather exciting! Perhaps in a geeky kind of way, I admit! But I think I'm going to have projects to work on off the back of all of this for many years to come, as I explore the implications of this new way of looking at the world. Very nice! I'll list up some sources of info for you at the bottom of the post if you want some pointers for your own research.
So drought prevention is all about allowing rain to infiltrate your soil and then providing the means for it to hang around without waterlogging the area. You've got a few steps to think about - firstly - where is rain being prevented from soaking in? Days like today are perfect for investigating this - get your raincoat on and head out there to see where water is pooling up. These areas have a problem and if you have a heavy clay soil like me, you're sure to be able to find them. If you're on a sandy soil, you can skip this step (step 1 below) and move on to step 2 - working to hold on to water.
So for a clay soil - you've found your puddling areas, and you'll notice that these are likely to be areas with moss or other problem weeds with either sharp, creeping roots or tap rooting ones, such as couch grass, dock and thistle. In these areas, there is soil compaction going on at some level in the soil profile - maybe at or near the top, but maybe deeper down. Where you have soil compaction and water logging, your plant roots cannot penetrate. They need oxygen. To be healthy, your plants need microbes and beneficial microbes cannot survive in waterlogged conditions. Disease causing ones can survive here. It's really important to sort this out.
You have two steps to improve this:
Step 1. Open up the clay using compost and grit/sharp sand.

This is the classic advice for these situations and doing this provides instant gaps between the tiny clay particles, allowing water and oxygen in. Where you have open soil, free from plants, dig these materials in. Mix them with your soil to at least a spade's depth, but ideally these areas should be double dug - dig out soil to a spade's depth and then fork over the base, mixing in compost and grit to a second spade's depth. For areas with established perennial plants, use a combination of a compost mulch, along with narrow yet deep holes filled with compost and grit/sand. To do this, use a sharpened bean pole, metal rod or similar to punch holes an inch or two wide and at least a foot deep into the soil all around your plants. Mix compost and grit/sand together in a bucket and sprinkle it into the holes.
Step 2. Seed your soil with microbes to keep it both free draining and moisture retentive in the long term.
Step one, if done using shop bought compost, can easily revert back to rubbish, waterlogged soil. Unless, that is, you set up a system for the soil to keep itself open and to keep adding more organic matter to itself each year. What I'm about to describe paradoxically helps a sandy soil in the opposite way, by also helping the soil to hold on to any water passing through. For both good drainage and moisture retention as a long term condition, you need microbes - this is where the biological, regenerative approach comes in.
Add either home made compost, a well made, aerated compost tea or a shop bought microbial soil amendment, such as an EM1 liquid feed or my current favourite from here in the UK - Microbz soil improver.
Microbes do three important things for the soil, in terms of drought resistance.
Firstly, they form symbiotic relationships with plants, helping them to produce ever more complex chemical structures, from simple sugars, right up to enzymes, proteins, lipids (fats) and ultimately the complex organic compounds, better known as humic acids. These humic substances are stable, organic compounds. Unlike the organic matter in shop bought compost, they cannot be digested and broken down into simpler substances, such as carbon dioxide gas. They are a stable store of carbon in the soil and will help your soil to maintain a good structure. Your soil will soak in more water, yet will be free draining enough for this water not to puddle up.
Secondly, micro organisms actively improve the structure of the soil themselves by producing a glue like substance that binds tiny soil particles into micro aggregates. Bacteria make tiny soil aggregates and fungi produce larger, yet still very small ones. All in all, your soil will become more randomly structured and so more naturally porous. Water will soak in and drain through your soil more extensively. Plant roots will be able to extend more deeply and thoroughly into the soil, enabling your plants to reach deeper stores of water during dry weather.
The third important drought busting thing that microbes do, is to use these soil aggregates to feed water to plants. Water will cling on to these teeny tiny clumps of soil in a microfilm around them, even under the driest of conditions. Experiments have shown how much water can be held this way: If a fully saturated soil is described as being 100% saturated with water, a dry, dusty soil that blows about in the wind - the type we had here in the UK in abundance last summer - is still 70% saturated!!! That's a lot of unexpected water! It's just that the water is held as a microfilm around the soil aggregates. Under normal farming conditions, or in gardens that use a lot of chemicals or have been suffering with water logged soil - ie where there are no beneficial microbes - this is a problem, as plants can't access water that is held in this way. The water is too tightly bound to the soil particles for plant roots to be able to pull it off. But microbes can get at this water and if you have lots of those in your soil, forming symbiotic relationships with your plants, they will feed this water to your plants in return for some of the sugars that your plants are producing each day.
So it's a win win situation! Drought shmought!
As I said, the way to increase microbes in your soil is by adding home made compost, an aerated compost tea or a microbial product, such as EM1 or Microbz. The best times to apply these things are the autumn and spring. This needs to be coupled up really with full plant cover - microbes and plants come together, the one feeding the other. To grow more microbes, you need to grow more plants as they live and thrive in the root systems of your plants.
Once you've set up this system, it is self perpetuating and you don't need to repeat it unless something drastic happens - like you use heavy machinery on the soil during wet weather, compacting it again. Or in a vegetable garden, that gets dug up regularly - this will damage and at least partly destroy the microbe communities in the soil, so it is worth seeding these in once a year.
As I said, I've been toying around with some of these ideas for years, but feel like I'm only now getting to grips with the wider implications of our microbial helpers. This year is the first year I've been applying these techniques broadscale in my garden. I'm looking forward to seeing the results of this and will keep you posted. If you're liking the sound of this, give it a go! And if you do, it'd be great to hear how it's working for you, so post us up something in the comments below.
For more information about regenerative practices, good starters include:
Regeneration International, who are working to increase the use of this approach globally. International news about this is posted up on their page along with their own blog articles. Inspirational reading.
Advancing Eco Agriculture are based in the US. They provide loads of free information - a blog, podcast, webinars and you tube lectures about using the regenerative approach in farming. They're doing some great work.
The book - Farm as Ecosystem - by Jerry Brunetti is a great primer.
Lastly - search for anything by Elaine Ingham on you tube. She's just great!
If you're into organic gardening and haven't come across the regenerative approach, I urge you strongly to find out more! I've been banging on about helping your soil food web, increasing the microbes in your soil for a while, but this year I did a bunch of research, listened to some lectures, read a few books and feel like I've emerged with much better understanding of what's going on between our plants, the soil and the life in the soil. This regenerative approach is not just really helpful to me in the garden, it's also rather exciting! Perhaps in a geeky kind of way, I admit! But I think I'm going to have projects to work on off the back of all of this for many years to come, as I explore the implications of this new way of looking at the world. Very nice! I'll list up some sources of info for you at the bottom of the post if you want some pointers for your own research.
So drought prevention is all about allowing rain to infiltrate your soil and then providing the means for it to hang around without waterlogging the area. You've got a few steps to think about - firstly - where is rain being prevented from soaking in? Days like today are perfect for investigating this - get your raincoat on and head out there to see where water is pooling up. These areas have a problem and if you have a heavy clay soil like me, you're sure to be able to find them. If you're on a sandy soil, you can skip this step (step 1 below) and move on to step 2 - working to hold on to water.
So for a clay soil - you've found your puddling areas, and you'll notice that these are likely to be areas with moss or other problem weeds with either sharp, creeping roots or tap rooting ones, such as couch grass, dock and thistle. In these areas, there is soil compaction going on at some level in the soil profile - maybe at or near the top, but maybe deeper down. Where you have soil compaction and water logging, your plant roots cannot penetrate. They need oxygen. To be healthy, your plants need microbes and beneficial microbes cannot survive in waterlogged conditions. Disease causing ones can survive here. It's really important to sort this out.
You have two steps to improve this:
Step 1. Open up the clay using compost and grit/sharp sand.

This is the classic advice for these situations and doing this provides instant gaps between the tiny clay particles, allowing water and oxygen in. Where you have open soil, free from plants, dig these materials in. Mix them with your soil to at least a spade's depth, but ideally these areas should be double dug - dig out soil to a spade's depth and then fork over the base, mixing in compost and grit to a second spade's depth. For areas with established perennial plants, use a combination of a compost mulch, along with narrow yet deep holes filled with compost and grit/sand. To do this, use a sharpened bean pole, metal rod or similar to punch holes an inch or two wide and at least a foot deep into the soil all around your plants. Mix compost and grit/sand together in a bucket and sprinkle it into the holes.
Step 2. Seed your soil with microbes to keep it both free draining and moisture retentive in the long term.
Step one, if done using shop bought compost, can easily revert back to rubbish, waterlogged soil. Unless, that is, you set up a system for the soil to keep itself open and to keep adding more organic matter to itself each year. What I'm about to describe paradoxically helps a sandy soil in the opposite way, by also helping the soil to hold on to any water passing through. For both good drainage and moisture retention as a long term condition, you need microbes - this is where the biological, regenerative approach comes in.
Add either home made compost, a well made, aerated compost tea or a shop bought microbial soil amendment, such as an EM1 liquid feed or my current favourite from here in the UK - Microbz soil improver.
 |
| Watering on aerated compost tea. Note the large holes in the watering can's rose - big enough to let the microbes through. |
Microbes do three important things for the soil, in terms of drought resistance.
Firstly, they form symbiotic relationships with plants, helping them to produce ever more complex chemical structures, from simple sugars, right up to enzymes, proteins, lipids (fats) and ultimately the complex organic compounds, better known as humic acids. These humic substances are stable, organic compounds. Unlike the organic matter in shop bought compost, they cannot be digested and broken down into simpler substances, such as carbon dioxide gas. They are a stable store of carbon in the soil and will help your soil to maintain a good structure. Your soil will soak in more water, yet will be free draining enough for this water not to puddle up.
Secondly, micro organisms actively improve the structure of the soil themselves by producing a glue like substance that binds tiny soil particles into micro aggregates. Bacteria make tiny soil aggregates and fungi produce larger, yet still very small ones. All in all, your soil will become more randomly structured and so more naturally porous. Water will soak in and drain through your soil more extensively. Plant roots will be able to extend more deeply and thoroughly into the soil, enabling your plants to reach deeper stores of water during dry weather.
 |
| In this magnified image of some activated compost, you can clearly see the fungal hyphae as white strands. This compost has been prepared this way to make an aerated compost tea that is rich in fungi for my more woody plants. |
The third important drought busting thing that microbes do, is to use these soil aggregates to feed water to plants. Water will cling on to these teeny tiny clumps of soil in a microfilm around them, even under the driest of conditions. Experiments have shown how much water can be held this way: If a fully saturated soil is described as being 100% saturated with water, a dry, dusty soil that blows about in the wind - the type we had here in the UK in abundance last summer - is still 70% saturated!!! That's a lot of unexpected water! It's just that the water is held as a microfilm around the soil aggregates. Under normal farming conditions, or in gardens that use a lot of chemicals or have been suffering with water logged soil - ie where there are no beneficial microbes - this is a problem, as plants can't access water that is held in this way. The water is too tightly bound to the soil particles for plant roots to be able to pull it off. But microbes can get at this water and if you have lots of those in your soil, forming symbiotic relationships with your plants, they will feed this water to your plants in return for some of the sugars that your plants are producing each day.
So it's a win win situation! Drought shmought!
As I said, the way to increase microbes in your soil is by adding home made compost, an aerated compost tea or a microbial product, such as EM1 or Microbz. The best times to apply these things are the autumn and spring. This needs to be coupled up really with full plant cover - microbes and plants come together, the one feeding the other. To grow more microbes, you need to grow more plants as they live and thrive in the root systems of your plants.
Once you've set up this system, it is self perpetuating and you don't need to repeat it unless something drastic happens - like you use heavy machinery on the soil during wet weather, compacting it again. Or in a vegetable garden, that gets dug up regularly - this will damage and at least partly destroy the microbe communities in the soil, so it is worth seeding these in once a year.
As I said, I've been toying around with some of these ideas for years, but feel like I'm only now getting to grips with the wider implications of our microbial helpers. This year is the first year I've been applying these techniques broadscale in my garden. I'm looking forward to seeing the results of this and will keep you posted. If you're liking the sound of this, give it a go! And if you do, it'd be great to hear how it's working for you, so post us up something in the comments below.
For more information about regenerative practices, good starters include:
Regeneration International, who are working to increase the use of this approach globally. International news about this is posted up on their page along with their own blog articles. Inspirational reading.
Advancing Eco Agriculture are based in the US. They provide loads of free information - a blog, podcast, webinars and you tube lectures about using the regenerative approach in farming. They're doing some great work.
The book - Farm as Ecosystem - by Jerry Brunetti is a great primer.
Lastly - search for anything by Elaine Ingham on you tube. She's just great!
Sunday, 25 November 2018
A Festival of Leaves
It’s been such a beautiful autumn this year. Driving out in the countryside and working out in the garden has been a real pleasure for all those wonderful fiery tones all around.


And I’m getting a really good leaf harvest now they’re finally dropping.
I’ve been collecting them up to make into leaf mould. If you’re not doing this already, I really recommend it. It’s a fantastic soil conditioner. It is full of organic matter and, more importantly, full of just the right kind of microbes for everything from a forest garden to a perennial bed - all those plants that will grow in a mature, forest ecosystem. If you think about it, these plants in the wild would expect a yearly dose of fallen leaves. This leaf fall is not just pretty, it’s a key event in the calendar for forest ecosystems. In fact, if you think about it, it’s basically soil critter Christmas!
This feast of autumn leaves means it’s time for microbes in the soil to get fat! Or certainly for their numbers to swell as they take on the monumental task of gorging themselves until every last leaf has been turned into soil - into organic matter, into plant food, into more fungi, bacteria, predatory protozoa, nematodes, micro arthropods and arthropods. In short - more workers for those forest plants to help them find the right kinds of foods they need in the year to come. To get back to our Christmas analogy - it’s like us stocking up on new socks, that new gadget for the kitchen or toys for the kids - the things we need to keep us going through the year. Each different species of microbe has a different specialism - a different mineral, for example, that they’re particularly good at mining for. So long as these microbes are there in the soil, the plants can call on them when a particular mineral is needed to help grow flowers intead of leaves or to help synthesise the appropriate substances needed to fight off a pest attack.
In a garden environment, we’ve taken a bit of a step away from natural ecosystems and tend to have a variety of different ecosystem types all rubbing up against each other. Fallen leaves are fine in areas that grow the types of plants found in woodland habitats - perennial beds, shrubberies or woodland gardens, for example. But we don’t want our lawn or driveway to start thinking about growing forest plants, so fallen leaves and the soil environment they create are a problem for these areas and it needs us to step in and help out by raking up those leaves. We’re basically holding succession back - halting the natural inclination of the environment to grow up, mature and become a forest.
So we rake up leaves from lawns, driveways, patios, vegetable beds - anywhere we don’t want to grow those forest style plants. I either pile mine up into huge mounds, or where I can, I make chicken wire pens to pour them in to. On a small scale, you can fill black bin bags punched with holes or hessian sacks. Make sure your leaves are damp, but not totally sodden. Site them somewhere shady and leave for at least a year. Apply the resultant black, crumbly leaf mould in the autumn to any appropriate garden beds bereft of their own festival of fallen leaves!
Subscribe to:
Posts (Atom)
LinkWithin
