Monday, 24 February 2020

Meadow Mania

I've become increasingly intrigued by the idea of growing a sown understorey to my forest garden, rather than the Plan A system of first planting trees and shrubs within an area of rough grass and then gradually opening up bed areas in which to plant useful herbaceous plants.

Bed areas are so expensive, not to mention high maintenance! I have several species of creeping weed that keep creeping in and smothering my herbs, which drives me nuts, makes a right mess of my lovely beds and gives me loads of work each year sorting it all out.

So Plan B - have just a few of the lovely herbaceous beds in gaps around my trees and shrubs, but otherwise sow a wildlife meadow. This will look great, will be really wildlife friendly and will need a fraction of the work to maintain.

With this in mind, I've found a local supplier of meadow seed and have been digging in to James Hitchmough's inspirational book 'Sowing Beauty' for tips on how to successfully grow beautiful perennial groundcover communities straight from seed. If you can get hold of a copy, I definitely recommend this book.


I'll be sowing meadow plants, as my ground is quite open and sunny, but in future when my trees have grown some more, I'm really keen to try using his techniques to grow a more low growing woodland understorey and also to try incorporating a mixture of both wildlife friendly and edible plants. Using seed rather than plants will save loads of money and by covering the ground in a year, it will take less work in the end to get a really full ground cover layer to the forest garden. The book has loads of tips on how to select appropriate plants for any given situation - right plant, right place being the key to success with this system.

For now though, with my plant choices pre selected by my local meadow seed supplier, here are my favourite top tips for getting a seed mix established:

1. Make sure you irrigate well from early spring to early summer. By this he means once every couple of days, which sounds like a lot to me, but he suggests this can have a huge impact on seedling emergence and survival. Evening irrigation is of course much more beneficial than morning irrigation.

2. Manage slugs. A top tip here if we're avoiding slugicide is to sow into a sand mulch. The most at risk areas are those near long grass or hedges - generally the boundaries of the site to be sown. Also risky are north or east facing slopes and clay soil covered in a compost mulch (being a very moisture retentive situation).

3. Weed control. You need to make sure your chosen species are dominating any weeds by the end of the first growing season (i.e. by autumn). This will mean you get a nice closed canopy of your chosen plants, which will keep future weeds at bay in future years. Sowing into a mulch can help with getting your plants established in a reduced weed environment and then spot weeding during the first year to reduce weed dominance may also be needed. The best time for taking out weed seedlings is generally early summer, when weeds are easy to identify. He suggests hand weeding on all fours, using string lines to mark up weeding aisles of about a 1.2m width, to make it easier to be systematic about covering the whole area.

Where time is limited, take out the most problematic weeds only - these are perennial clump forming plants, such as docks and creeping plants, such as bindweed, creeping thistle, couch grass and nettles. Creeping buttercup and clover can be a bit of an issue, but being shorter, are less problematic in meadow or prairie sowings. The best time for taking out perennial weeds is over winter and early spring when the plant cover is more open and accessible.


Monday, 18 March 2019

Regenerative Pest Control

Spring time is such a hopeful time. I love it right now, watching all the green buds starting to burst open. However, I also know that I've had a lot of problems with insect pests in the past and that for some of my plants this beautiful start is all shot to pieces by the time we get to summer. As an organic gardener, there are loads of natural pesticides to choose from that are safe for kids and pets and biodegrade quickly, causing no long term problems for wildlife.

However, as I've been learning from John Kempf and the Advancing Eco Agriculture Team, there is a better way!

John's regenerative approach is all about setting up a healthy growing system that naturally eliminates pests. It's like us working to keep our bodies fit and healthy to avoid being vulnerable to winter bugs - we eat well, we get exercise. In gardens, it's the same - for vibrant health, plants need to get better nutrition and interact more with the world around them. John explains this really clearly as a four step journey to full health. I definitely recommend checking out the webinar he gives on this, but for those who prefer to read, here's a summary:

So there are four stages of health and four sets of pests. As you help your plants advance from one stage to another, the pests fall away, one by one. Knowing this, you can get out into your garden straight away to see what stage of health your plants are at.

Stage 1 is all about gaining complete photosynthesis in order to stop your plant from accidentally feeding soil based fungal pathogens, such as fusarium and verticillium wilts, which give you yellowing, stunted and wilting plants.

Most plants are only photosynthesising at around 25% of the rate they could be. This means a difference in the type of sugars they produce - at this rate, they produce the type of sugar that attracts fungal pathogens in the soil, such as verticilium and fusarium. Increase the photosynthesis and the plants no longer do this - they produce more of the complex carbohydrates that support beneficial soil life.

The shortfall is due to not having enough of the minerals plants need for photosynthesis - they need Magnesium, Iron, Manganese and Nitrogen. Phosphorous is also important for this stage of health.

Minerals can be added naturally using a liquid seaweed extract, sprayed directly onto the leaves of your plants. For acid loving plants, such as rhododendron and camellia, you can buy special seaweed extracts tailored for this type of plant (containing extra iron). If you want to know for sure this is working, photosynthesis levels can be checked using a refractometer - these cost around £20 online. They give a brix reading for your plants, with normal, poor health being at 3-5, whereas with good levels of photosynthesis you will find readings of 12-15 or more.

With level 1 complete, level 2 is now up for grabs:

Stage 2 is about cleansing the sap in your plant of food for some major insect pests - if you have problems with larval pests, aphids or other sap sucking insects then you need help here.

Like stage 1, this stage is also about mineral balance. As well as producing sugars with photosynthesis, plants also make proteins and amino acids, which are vital to their growth and vitality. However, without enough of the right minerals, plants are left with part of the building blocks for amino acids and proteins - the nitrates and ammonium, but can't process them any further, meaning these substances are left floating around in their sap. This is like setting out a buffet for those sap sucking pests as nitrates and ammonium are exactly what they love to eat, so they head straight over to gorge on your plants. Pests here include aphids, leafhoppers, whitefly and spider mites.

The answer is the same as for stage 1 - feed your plants the minerals they need - in this instance it's Magnesium again, along with Sulphur, Molybdenum and Boron. A seaweed spray to leaves should do the trick.

Stage 3 is all about shielding - plants at this stage of health are able to put up shields on the leaf surface to protect themselves from airborne fungal and bacterial pathogens, including mildew, blight and rust.

At this stage, plants have achieved a solid symbiotic relationship with microbes in the soil. They are gaining the vast majority of their nutrition in the form of microbial metabolites. They are getting such good levels of nutrition in fact that they are able to store an excess as lipids - as oils and waxes. These are what make the protective shields on the leaf surface. Expect to see rich, green, glossy leaves. Excess lipids are fed into the soil via the root system to feed microbes.

We can help our plants reach this stage of health by feeding the soil with microbial innoculants. These include home made, well rotted compost, aerated compost tea and proprietary innoculants, which come in either powder or liquid format - both of which can be added to cans of water to simply water into the soil.

You can conduct a fairly simple test at home to give you a bit of an idea of how healthy your soil microbial populations are. This is called the slake test and it tests for soil aggregate stability. If the aggregates (small clumps) are quite stable, this indicates microbes are really active and are busy doing lots of what they do naturally - gluing tiny soil particles together into larger clumps. The more stable these are, the more abundant your microbes must be.

Stage 4 is about increasing production of some of the most complex plant chemicals - secondary metabolites. These are the essential oils, the terpenes, tanins and other substances that the plants use to actively keep themselves and their neighbours healthy. At this stage of health, plants are able to protect themselves from beetles, nematodes and viruses.

To gain this stage of health, plants need the correct microbes to be present in the soil and on plant surfaces above ground too. We can help our plants get to this stage of health by adding microbial innoculants, as for stage 3. In addition, it might be worth trying to source some healthy soil from an equivalent habitat in the wild (woodland/rocky scrub/wetland etc) and using it to make an aerated compost tea. This method enables you to seed your land with microbes that may be missing. Make sure to get the landowner's permission to take some of their soil!


So I will be putting all of this to the test over the coming months and years and will keep you updated. I'm really excited about getting going with this. Dealing with pests in this way completely turns pest control on its head. Instead of looking at pests as a problem to be eliminated, I'm looking forward to looking more carefully at which pests or diseases I have in which areas as it's going to tell me what is wrong with the soil in that part of the garden. Using the four steps above, I'll straight away know what the cure is likely to be and can feel confident that my work is bringing the yard here back up to full health.


Friday, 21 December 2018

Seeding the Living Soil

I've been getting rather excited about aerated compost teas and am feeling very optimistic that they are going to transform the health of my garden. If you also have problems with a heavy clay soil, you may find this works for you too.


My poor, heavy clay soil is still really struggling, despite it being several years now since we lifted the concrete. All that time under cover has really taken its toll. I've been using no dig methods and have planted good, deep rooting ground cover plants with a view to opening up the soil and generally improving soil structure, yet still, most trees and shrubs I plant out fail to thrive. Over the last couple of years, this has really been starting to get me down. Has this whole reclamation project led me down a dead end? Were my aims to build a thriving wildlife haven and productive garden out of an old concrete covered farmyard completely unrealistic?! Is our soil actually beyond help?

Eek!

However, I'm not one to be defeated. On the contrary, I really love a challenge. So, with renewed vigour, I've been doing my research, trying to find good, ecological ways to bring soil back into good health. Over this last year, I've discovered agro ecology and regenerative agriculture and they've restored my gardening mojo! I feel like I was missing several pieces in the garden-as-ecosystem jigsaw and that the regenerative approach to managing land has filled in a good chunk of those gaps for me.

And they're claiming some amazing results from using their regenerative techniques - higher yields, reduced or eliminated chemical inputs, reduced or eliminated pests and diseases, higher nutritional content, reduced atmospheric carbon dioxide, increased biodiversity, increased drought tolerance, increased depth of topsoil...

So over the last month or so, I've been putting into place the beginning of my new soil improvement plan. The foundation of the regenerative approach is that healthy soil needs healthy populations of micro organisms. Step two - if you like - is that to keep these alive and thriving, you need the ground to be filled with plants (the plants feed the microbes and the microbes feed the plants). I think this has been my problem - my soil - stuck under concrete as it was - has been devoid of these microbes for so long, it is surely really struggling to establish healthy populations again. I've been doing all the things you're meant to do to look after your microbes, yet when there aren't the healthy microbes there to start with, it hasn't really been helping very much.

I suspect this is a problem actually anywhere where you have a really heavy clay soil. Where your soil is getting waterlogged, those healthy supportive microbes can't survive. In fact, waterlogged soils or those that don't have contact with the air are exactly the kinds of environment the bad microbes love - disease causing microbes and those that support problem weeds like creeping thistles. The microbes we want as gardeners need an open, aerated soil - the same conditions that our garden plants want. The good news is that if you can get hold of some of these microbes and seed them into your soil, they will create the kind of open, aerated soil that they and their plant partners love so much. And then you get all those amazing knock on benefits I listed up above about pest control, drought tolerance, carbon sequestration and so on. It's a beautiful win win situation with bonus points for all!

This is what they all say anyhow.

However, I never like to fully believe something until I've tried it myself.

So - to get these supportive microbes into your soil throughout an entire garden, you need to either make a decent compost tea or you need to buy a decent microbial product. I'm going to explain how to make your own compost tea and all the ingredients that make it really effective below. But depending on where you live, you may also be able to find a product on the market that includes the same supplementary ingredients, saving you a lot of bother! But it is certainly cheaper and probably more effective to make your own.

My recipe for compost tea is based on advice from Dan Kittredge from Bionutrient.org, mixed with tips from Elaine Ingham in her book Gardening With Nature and advice from Jeff Lowenfels in Teaming with Microbes. Skip to the end if you want a concise version!

So when you make your compost tea, the first thing you need to know is that it needs aerating. You can't just soak some compost in water and expect these microbes to survive! I use a standard fish tank aerator, with two air stones, submerged in a 15 litre bucket of rainwater. I weight them down to the bottom with rocks.

Rainwater is important - remember chlorinated tap water is designed to kill microbes. You can use tap water if you leave it to stand for a few hours first, but rainwater is best.

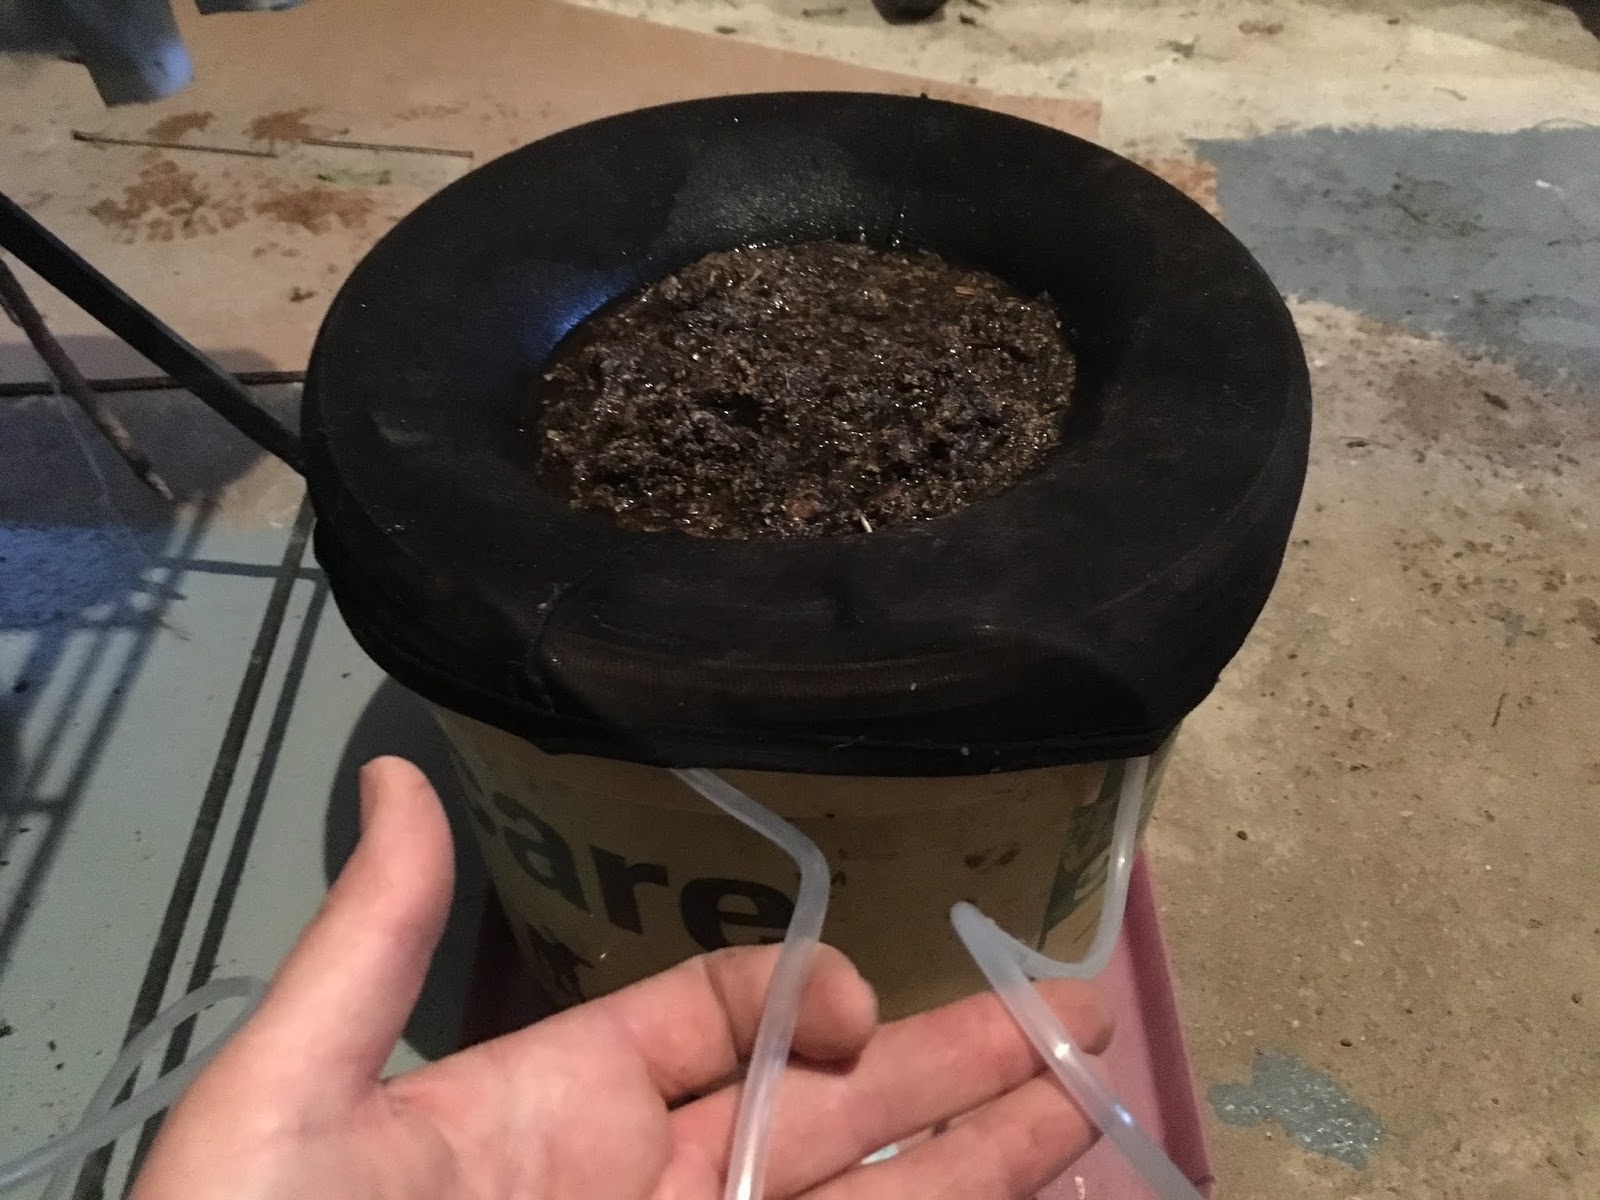
Then you need microbes - well rotted, home made compost. I use about 3 cups of compost. If I'm going to be watering this tea onto veg beds or lawn, I use the compost fresh from the compost bin. If I'm making tea for my perennial beds, shrubberies, forest garden or any other areas with perennials and woody plants, I first activate the fungi in the compost as these are really important mature plant partners. I basically add a handful of bran and after a few days you can see lots of fungal hyphae growing all over the compost like thick spiders' webs. This is ready to use. It goes into an old pair of tights, like a giant tea bag, to make it easy to strain out at the end. I stretch them over the top of my bucket with the aerator tubes sticking out underneath like this:


Then you need to add microbe food and habitat. The key microbes you want to feed are the smallest ones - the bacteria and fungi. These form the base of the food chain for all the higher microbes. For bacteria, you add some kind of sugar (1.5 tablespoons) - molasses, honey, apple juice, cane sugar even. I use molasses. Fungi feed on more fibrous materials. I use apple pulp and bran (2 tablespoons). I also add rock dust (1 cup) - this provides minerals for the bacteria and fungi to digest and make available for my plants. I also add liquid humates (2 tsp) - these are stable organic compounds, which can't be digested any further by microbes, but which are incredibly complex in structure and so provide habitat for these tiny creatures. They are also really good at cleaning up the soil and water by locking any toxins away.


So this mix bubbles away for a day and a half and then I dilute it down - roughly 1 litre of compost tea to a 40 litre trug of rainwater - and I water this all over my land - beds, paths and all. My 15 litre bucket of aerated compost tea was enough for our three quarters of an acre.


For a microbially poor soil like mine, or - I would say - any heavily waterlogged clay soils - your soil will really thank you if you apply this once a fortnight for three months. I'll be doing this throughout the spring. Then ease it back to monthly for the next three months.

After that and for any gardens that aren't in too bad a state to start with - you can boost your garden health further by applying this mix three times a year -

1. in spring just before your plants wake up - as a soil drench
2. in spring just after leaves unfurl - as a foliar treatment
3. in autumn after leaf fall - as a soil drench.

So having got this process started, now I wait, hoping to see some of those amazing benefits regenerative farmers are describing! I'm keeping my fingers crossed and will keep you updated.


Compost Tea Recipe
Makes 3 gallons - treats 3/4 acre

3 gallons rainwater
3 cups compost (home made)*
1.5 tbsp molasses (or other sugar)
2 tsp liquid humates
1 cup rock dust
2 tbsp fibrous material - e.g. apple pulp, bran, oatmeal

*for perennial and woody plants, activate compost by adding a handful of bran/oatmeal approx 5 days before brewing the tea. Wait until white fungal strands can be seen before using. Veg beds and lawn need no pre prep of compost.

Brew tea using submerged aerators for 1.5 days.

Dilute to use - roughly 1 litre tea per 40 litre trug (or 1 cup per 10 litre watering can).

Monday, 10 December 2018

Winter Salad from the Foraging Garden

This week, I'm joining in with the lovely Happy Acres Blog's 'Harvest Monday' feature and am sharing my morning's harvest with you. It's the beginning of my abundant free salad season - my perennial salad plants seem to be at their best from now through until the spring, so I'm looking forward to a season ahead with lots of fresh salad. I'm also feeling super chuffed at not having had to lift a finger to make that happen!

So for my lunch time salad today, I picked:

Some wild rocket from the flower bed. This plant is probably about five years old now and I thought it had had it actually. But as you can see, it's still soldiering on, even if it is a little long in the tooth!

It's just starting to pick up after I chopped all the flower heads off during the autumn, so this is the start of my rocket season. During the summer, I still use it a little, but it tends to get little holes nibbled into it from flea beetles, so I'm a bit selective about which visitors I feed it too! Over winter this isn't a problem. Today, I used this as the bulk ingredient.


Nearby, I still have a little milky bellflower in leaf, which is good and mild flavoured again now it's finished flowering.


I also picked a little sweet violet leaf from under my apple tree. This one tastes good, but is a little hairy. Not the texture you tend to think of when planning a salad! So I just put a little in and generally no-one notices.


My lamb's lettuce is just starting to come through. I bought seed for this maybe ten years ago now and since then I've never needed to sow it again - it appears in my vegetable beds (and some flower beds) each autumn and grows away until it flowers and goes to seed in the spring. At that point, I weed it all out to make room for vegetables, but so long as I let it seed, it always comes back in the autumn. This is a really good, mild salad leaf with lovely flavour and texture. A little later in the winter I should be able to use this as a bulk ingredient too. Right now I just have little bits to use, but it's well worth adding in nevertheless.


Also in the vegetable garden are a  few marigold plants, which are still flowering away well. I just use the petals, although you can eat the whole flower.


Over to the forest garden, I have some new salad plants - my saltbushes. These are related to quinoa and so are really mineral rich. And they really do taste salty! The leaves have a great texture and the flavour is really good too.


Lastly were some primrose flowers from under my silver birch tree.


We ate this for lunch with a simple honey, oil and vinegar dressing and some roast squash.


For more harvesting inspiration, head over to Happy Acres to see what else is coming out of the garden right now!

Tuesday, 4 December 2018

Drought Relief - A Regenerative Gardening Approach

It's currently pouring with rain, so it seems rather odd to be sat here writing about drought relief! But this year we had a really hot, dry summer and plants around here really suffered. So with that in mind, I'm taking measures to improve things for the years to come. And I'm using a biological, regenerative approach.

If you're into organic gardening and haven't come across the regenerative approach, I urge you strongly to find out more! I've been banging on about helping your soil food web, increasing the microbes in your soil for a while, but this year I did a bunch of research, listened to some lectures, read a few books and feel like I've emerged with much better understanding of what's going on between our plants, the soil and the life in the soil. This regenerative approach is not just really helpful to me in the garden, it's also rather exciting! Perhaps in a geeky kind of way, I admit! But I think I'm going to have projects to work on off the back of all of this for many years to come, as I explore the implications of this new way of looking at  the world. Very nice! I'll list up some sources of info for you at the bottom of the post if you want some pointers for your own research.

So drought prevention is all about allowing rain to infiltrate your soil and then providing the means for it to hang around without waterlogging the area. You've got a few steps to think about - firstly - where is rain being prevented from soaking in? Days like today are perfect for investigating this - get your raincoat on and head out there to see where water is pooling up. These areas have a problem and if you have a heavy clay soil like me, you're sure to be able to find them. If you're on a sandy soil, you can skip this step (step 1 below) and move on to step 2 - working to hold on to water.

So for a clay soil - you've found your puddling areas, and you'll notice that these are likely to be areas with moss or other problem weeds with either sharp, creeping roots or tap rooting ones, such as couch grass, dock and thistle. In these areas, there is soil compaction going on at some level in the soil profile - maybe at or near the top, but maybe deeper down. Where you have soil compaction and water logging, your plant roots cannot penetrate. They need oxygen. To be healthy, your plants need microbes and beneficial microbes cannot survive in waterlogged conditions. Disease causing ones can survive here. It's really important to sort this out.

You have two steps to improve this:

Step 1. Open up the clay using compost and grit/sharp sand.


This is the classic advice for these situations and doing this provides instant gaps between the tiny clay particles, allowing water and oxygen in. Where you have open soil, free from plants, dig these materials in. Mix them with your soil to at least a spade's depth, but ideally these areas should be double dug - dig out soil to a spade's depth and then fork over the base, mixing in compost and grit to a second spade's depth. For areas with established perennial plants, use a combination of a compost mulch, along with narrow yet deep holes filled with compost and grit/sand. To do this, use a sharpened bean pole, metal rod or similar to punch holes an inch or two wide and at least a foot deep into the soil all around your plants. Mix compost and grit/sand together in a bucket and sprinkle it into the holes.

Step 2. Seed your soil with microbes to keep it both free draining and moisture retentive in the long term.

Step one, if done using shop bought compost, can easily revert back to rubbish, waterlogged soil. Unless, that is, you set up a system for the soil to keep itself open and to keep adding more organic matter to itself each year. What I'm about to describe paradoxically helps a sandy soil in the opposite way, by also helping the soil to hold on to any water passing through. For both good drainage and moisture retention as a long term condition, you need microbes - this is where the biological, regenerative approach comes in.

Add either home made compost, a well made, aerated compost tea or a shop bought microbial soil amendment, such as an EM1 liquid feed or my current favourite from here in the UK - Microbz soil improver.

aerated compost tea
Watering on aerated compost tea. Note the large holes in the watering can's rose - big enough to let the microbes through.

Microbes do three important things for the soil, in terms of drought resistance.

Firstly, they form symbiotic relationships with plants, helping them to produce ever more complex chemical structures, from simple sugars, right up to enzymes, proteins, lipids (fats) and ultimately the complex organic compounds, better known as humic acids. These humic substances are stable, organic compounds. Unlike the organic matter in shop bought compost, they cannot be digested and broken down into simpler substances, such as carbon dioxide gas. They are a stable store of carbon in the soil and will help your soil to maintain a good structure. Your soil will soak in more water, yet will be free draining enough for this water not to puddle up.

Secondly, micro organisms actively improve the structure of the soil themselves by producing a glue like substance that binds tiny soil particles into micro aggregates. Bacteria make tiny soil aggregates and fungi produce larger, yet still very small ones. All in all, your soil will become more randomly structured and so more naturally porous. Water will soak in and drain through your soil more extensively. Plant roots will be able to extend more deeply and thoroughly into the soil, enabling your plants to reach deeper stores of water during dry weather.

fungal hyphae in compost
In this magnified image of some activated compost, you can clearly see the fungal hyphae as white strands. This compost has been prepared this way to make an aerated compost tea that is rich in fungi for my more woody plants.

The third important drought busting thing that microbes do, is to use these soil aggregates to feed water to plants. Water will cling on to these teeny tiny clumps of soil in a microfilm around them, even under the driest of conditions. Experiments have shown how much water can be held this way: If a fully saturated soil is described as being 100% saturated with water, a dry, dusty soil that blows about in the wind - the type we had here in the UK in abundance last summer - is still 70% saturated!!! That's a lot of unexpected water! It's just that the water is held as a microfilm around the soil aggregates. Under normal farming conditions, or in gardens that use a lot of chemicals or have been suffering with water logged soil - ie where there are no beneficial microbes - this is a problem, as plants can't access water that is held in this way. The water is too tightly bound to the soil particles for plant roots to be able to pull it off. But microbes can get at this water and if you have lots of those in your soil, forming symbiotic relationships with your plants, they will feed this water to your plants in return for some of the sugars that your plants are producing each day.

So it's a win win situation! Drought shmought!

As I said, the way to increase microbes in your soil is by adding home made compost, an aerated compost tea or a microbial product, such as EM1 or Microbz. The best times to apply these things are the autumn and spring. This needs to be coupled up really with full plant cover - microbes and plants come together, the one feeding the other. To grow more microbes, you need to grow more plants as they live and thrive in the root systems of your plants.

Once you've set up this system, it is self perpetuating and you don't need to repeat it unless something drastic happens - like you use heavy machinery on the soil during wet weather, compacting it again. Or in a vegetable garden, that gets dug up regularly - this will damage and at least partly destroy the microbe communities in the soil, so it is worth seeding these in once a year.

As I said, I've been toying around with some of these ideas for years, but feel like I'm only now getting to grips with the wider implications of our microbial helpers. This year is the first year I've been applying these techniques broadscale in my garden. I'm looking forward to seeing the results of this and will keep you posted. If you're liking the sound of this, give it a go! And if you do, it'd be great to hear how it's working for you, so post us up something in the comments below.

For more information about regenerative practices, good starters include:

Regeneration International, who are working to increase the use of this approach globally. International news about this is posted up on their page along with their own blog articles. Inspirational reading.

Advancing Eco Agriculture are based in the US. They provide loads of free information - a blog, podcast, webinars and you tube lectures about using the regenerative approach in farming. They're doing some great work.

The book - Farm as Ecosystem - by Jerry Brunetti is a great primer.

Lastly - search for anything by Elaine Ingham on you tube. She's just great!

Thursday, 29 November 2018

Introducing Tuesday’s Robin

In all the gardens I work in, there is a friendly robin, who often comes to see what I’m up to. The garden I work in on Tuesdays had the friendliest robin of all. Sometimes he follows me around all day, hopping quite close to inspect any fresh earth I’ve turned over or perching in the bushes or trees nearby to sing me a little song.

It’s in the autumn and winter that I see him do this the most - when he isn’t busy chatting up the ladies and looking after his young chicks as he does in the spring and summer. This time of year, even if I’m not digging over any soil, he often turns up nearby and will sing me a soft and quiet song, rather than his usual territorial exclamation of a song that he calls from the treetops. This song is gentle and meandering and given the muted volume and the fact that he follows me around to sing it, it appears to be sung just for me.

This week I managed to get you a recording so you can hear tuesday’s robin too. Please excuse the sound of my clipping in the background! He was sitting in the hedge right beside me while I chopped up materials for the compost.


I wouldn't call myself an expert at befriending robins, for that you'd need to turn to someone like Jon Young and his amazing bird book 'What the Robin Knows'. However, my top tips for this are:

1. Make a point of spending good chunks of time in the garden as a whole and working away in a single spot in particular.

2. Start letting your robin know you've seen it and that you're friendly, rather than a threat. If a robin approaches, say hello! Don't turn and stare at him - he might find this threatening. Instead, once you've spotted he's there, get back to what you were doing and just perhaps keep an eye on him out of the corner of your eye.

3. You could try playing a little call and response - this is something birds do with each other - one will sing a little tune and then the other will sing a little tune back and then the first one will reply again and then the second and so on. So hum, whistle or sing a little tune and then pause and see if your robin will sing back. Or wait for your robin to sing and then when he pauses, sing a little tune back. You may find you get a nice little duet going! You might find he takes to this straight away or it may take a good few tries to get something like this going.

4. If a robin approaches really quite close, keep still or only move very slowly and chat to him, so he can get used to you. You may eventually find that he hops right up to you and looks you in the eye. This is a really special thing!

5. The next step I'm working towards is to be able to feed my little robin. I've done it once with a little worm, but I've tried and failed so many times. You need to build up some trust first and then very gently toss something kind of towards but not directly at him. Usually I've found that anything thrown towards a robin scares him off. It's all about slow movement and a lot of patience. The time he took it, I carefully put it down and then slowly looked away - but made sure I could still see him out the corner of my eye. And I waited a while... and then hooray - he came and took it!

One thing you'll find as well as you get to know your robin is that they all have distinct personalities. One robin I've met - he used to come visit me on wednesdays - was great for call and response games. He'd sing so very softly and we'd sing/whistle back and forth to each other for ages. He used to be really plucky and would come sit on the edge of my weed bucket to watch what I was putting in. Tuesday's robin is a louder singer. He sings away merrily by himself, often long and beautiful songs. He's taken longer to become comfortable enough with me to get down on the ground and inspect my work, while I'm still at it. My robin at home is only just now starting to pay me visits while I'm out in the garden, but then I don't have such a regular routine with tending my own garden and often have noisy children with me!

So I definitely recommend keeping an eye out for your robin. Or whichever bird it is that is friendliest where you live. It's a lovely way to begin to feel connected to the natural world around you.


Sunday, 25 November 2018

A Festival of Leaves

It’s been such a beautiful autumn this year. Driving out in the countryside and working out in the garden has been a real pleasure for all those wonderful fiery tones all around.

And I’m getting a really good leaf harvest now they’re finally dropping. 


I’ve been collecting them up to make into leaf mould. If you’re not doing this already, I really recommend it. It’s a fantastic soil conditioner. It is full of organic matter and, more importantly, full of just the right kind of microbes for everything from a forest garden to a perennial bed - all those plants that will grow in a mature, forest ecosystem. If you think about it, these plants in the wild would expect a yearly dose of fallen leaves. This leaf fall is not just pretty, it’s a key event in the calendar for forest ecosystems. In fact, if you think about it, it’s basically soil critter Christmas!

This feast of autumn leaves means it’s time for microbes in the soil to get fat! Or certainly for their numbers to swell as they take on the monumental task of gorging themselves until every last leaf has been turned into soil - into organic matter, into plant food, into more fungi, bacteria, predatory protozoa, nematodes, micro arthropods and arthropods. In short - more workers for those forest plants to help them find the right kinds of foods they need in the year to come. To get back to our Christmas analogy -  it’s like us stocking up on new socks, that new gadget for the kitchen or toys for the kids - the things we need to keep us going through the year. Each different species of microbe has a different specialism - a different mineral, for example, that they’re particularly good at mining for. So long as these microbes are there in the soil, the plants can call on them when a particular mineral is needed to help grow flowers intead of leaves or to help synthesise the appropriate substances needed to fight off a pest attack.

In a garden environment, we’ve taken a bit of a step away from natural ecosystems and tend to have a variety of different ecosystem types all rubbing up against each other. Fallen leaves are fine in areas that grow the types of plants found in woodland habitats - perennial beds, shrubberies or woodland gardens, for example. But we don’t want our lawn or driveway to start thinking about growing forest plants, so fallen leaves and the soil environment they create are a problem for these areas and it needs us to step in and help out by raking up those leaves. We’re basically holding succession back - halting the natural inclination of the environment to grow up, mature and become a forest.

So we rake up leaves from lawns, driveways, patios, vegetable beds - anywhere we don’t want to grow those forest style plants. I either pile mine up into huge mounds, or where I can, I make chicken wire pens to pour them in to. On a small scale, you can fill black bin bags punched with holes or hessian sacks. Make sure your leaves are damp, but not totally sodden. Site them somewhere shady and leave for at least a year. Apply the resultant black, crumbly leaf mould in the autumn to any appropriate garden beds bereft of their own festival of fallen leaves!


Friday, 27 May 2016

Understanding Soil Ecosystems

I've been doing a little research into soil ecosystems. After all, this is what my no-dig approach is all about - supporting those networks of life within the soil that help to keep it healthy and full of nutrients for my plants. And what I've found out has made me even more adamant that the no dig approach is the way forward. I've also learnt some very useful new tips about managing the soil in an appropriate manner for the type of plants I'm trying to grow.


My main source has been Jeff Lowenfels and Wayne Lewis's book 'Teaming With Microbes' and I would definitely recommend this book for anyone interested in finding out more about some of the science behind the no dig approach. The basic conclusions of their book are that it's important to look after the complex ecosystems in the soil as microorganisms in the soil readily provide all the nutrients our plants need to grow just as a by product of being alive. Different types of soil ecosystems exist for different types of plants and we can manage the soil carefully to encourage the system needed for whatever we're trying to grow.


Just think about it - no additions of man made fertiliser, synthetic or organically produced, are needed in an old growth forest. Thriving and abundantly healthy natural systems exist because of this soil based support system, which can only be found in undisturbed soil. Hence the no dig approach. As soon as you dig the soil, you smash up delicate networks of mycorrhizae, you throw deep soil micro organisms to the top and bury those that prefer to be at the surface. Whole hosts of organisms can't recover from this shock and are wiped out. Their complex interconnected networks have to be completely rebuilt. Additions of fertilisers, pesticides and fungicides are also lethal to this system. Intensively farmed soils are consequently all but dead.


But when they are left undisturbed, it's an amazing system and it's something that we can support through careful management practices.


The soil contains ecosystems every bit as complex as those in the rainforest, temperate woodland or coral reef, for example. All manner of beasts make homes alongside each other - predators and prey both visible to the naked eye and so tiny we can't perceive them without magnification. In a single handful of soil, there are more organisms than there are people on the planet. Think of the worlds of activity going on in a simple back yard with all that mini life hidden beneath the surface.

They're busy at it - living, thriving, hunting, scavenging, dying, eating, excreting, creating the basis of all live above their world - food for our plants.


The main organisms we're interested in are the smallest - the fungi and the bacteria. They consume the wastes of larger soil organisms and the wastes they produce are nitrogen based and form the bulk of soil-based plant foods. Fungi produce ammonium and bacteria produce nitrates. Both of these natural forms of nitrogen are in a plant-ready format and are more easily absorbed by plants than synthetic forms of nitrogen. Neither is washed out by rain water in the same way that synthetic fertilisers are, making more food available to plants.


And handily, the soils that fungi thrive the most in are those that support the types of plant that like ammonium based nitrogen - forest soils. Bacterially dominated soils - producing nitrates - support plants that are less woody and with typically shorter life spans- your vegetable garden or lawn, for example.


Here are a few top tips for encouraging the right kind of soil food web for your plants :


- for a bacterially dominated soil (eg the vegetable garden), use a home made compost with green plants as the main ingredient. Either incorporate this into the top layer of soil or use it as a mulch on top.


- for a fungally dominated soil (eg forest garden or shrub and perennial plant based flower bed), use a home made compost with brown materials as the main ingredient. A leaf mould is ideal. Apply as a mulch. Don't work into the soil. You can also simply add woody materials as a mulch- little piles or a mulch of prunings of twigs and small branches or even woodchips can all help tip the soil food web more towards a natural woodland type.


Monday, 27 April 2015

The Forest Garden Begins

At last, I feel I can say that we have a proper forest garden - albeit a very young one - and not just the little foresty bits around the edges that it's been for so long. We've been planning and working towards this for years, having started with an old yard covered in concrete. This winter, with soil preparations suitably advanced over part of the plot, it was finally time to get planting.

And now it's Spring, I'm enjoying watching them all wake up for their first year at Oak House.

So let me introduce you:

Walking along towards the forest garden from the house, we first come across the Medlar, welcoming us through onto the main pathway. This one is for David and I've promised to give it a try, but have to admit it sounds revolting - you apparently leave the fruit on the tree until they've putrified inside and then suck out the gooey middle. It apparently tastes a bit like caremel and David swears it's heavenly. I'll keep you posted!

The borders to the main path are yet to be planted, so we'll head along a little side path up onto the bank.


This is where the chop and drop soil improving plants have had a couple of years getting the soil ready for me and so this is where I've been busy planting out this winter. In the photo above you can see cocksfoot grass and red clover, both of which are fast growing and deep rooting, so help both break up my compacted soil and add lots of humus if I chop them back regularly. All the plants going in here are shade tolerant as this is the northern edge of the forest garden.

Next along this side path, we come across the Califonia Allspice - a suckering shrub whose bark can be used as a cinammon substitute. I can't wait to give this one a try!


This plant is normally dark red flowering, but I'm aiming for a more naturalistic woodland look, so went for a less exotic, green-white flowering variety called California Allspice 'Athens'. The flower buds are just forming now, as you can see above.

Along the path, I've planted several red currants - this is one of the best fruit bushes for shady areas, so planting it along the northern edge of my plot seemed a sensible idea.


In the background of the photo above, you can see one of my many broom plants. I have them scattered around, their main purpose being to fix nitrogen to feed all my growing plants. I also use them as a chop and drop mulch to improve the soil. Being a woody chop and drop, it's even better for helping to create a woodland type soil, feeding the kind of soil organisms you'd expect beneath trees.

Next to the redcurrant pictured above, I've planted a little aquelegia as an early perennial salad crop - the leaves are very good in a mixed salad in the early part of the year as the young ones are just emerging. It's also good for pollinating insects once it starts flowering in late spring. It's good here, as it tolerates part shade.


A little further along is an apple tree - Tom Putt - a good all rounder.


Travelling around the corner, past more red currant, we come to the lovely Lizzie Plum. Another one I can't wait for. I have to admit to being totally sold on the catalogue photo of the fruits of this one - big, juicy, dark red plums. Makes my mouth water just thinking about it! No flowers yet though, so I'll be waiting a while to try them.


This is underplanted with lupins for nitrogen fixing and pollinating insects.


Nearby is one of my honey berry bushes - these are a non climbing relation of honeysuckle, that produce blue fruits which apparently taste a little like blueberries, but with a honey aftertaste.


Last along the path is the Mulberry. I just had to have one of these as they are my all time favourite fruit. Like giant raspberries, but with way more flavour. Wonderfully juicy, a little tart and extremely more-ish.

Later this year, I hope to get a few more understorey plants in. I've not decided exactly what yet, but am looking forward to selecting a good mix of useful and edible plants. Comfrey, strawberries... Any suggestions are welcome!


Monday, 20 April 2015

Year round salads


One of the dreams I've been chasing in my garden over the last few years is to have year round salads without any effort at all. I'm quite a fan of a fresh green salad, but as a busy mum of two busy young kids, I struggle to keep a good succession of lettuce growing. Either the slugs get them, they go to seed before I find time to harvest them or I just don't find the time to get enough batches growing from seed to keep a regular supply going in the veg beds. So one of the goals of going perennial in the vegetable garden has been to sort this out. Latin names for all the plants listed are given at the end.

Having said I've been searching for year round perennial salad plants, two of my key players are actually annuals. Both of these plants self seed abundantly and between them, provide excellent supplies of lovely, mild tasting salad leaves year round.

For the autumn through winter, until early spring, I have Lamb's Lettuce.


And for the late spring, right through summer and to the early autumn, Mountain Spinach.


Right at the end of winter, my perennial rocket springs into life after its short winter sleep, so these plants give rocket leaves nearly all year round. After their first year, the plants reach a fantastic size, providing plenty of salad leaves for us from just one plant. Here is one of my plants, with just its early spring growth showing. By mid summer, this will be a sizeable bush.


Fresh, young Aquelegia leaves emerge around the same time. I initially put this plant in for its flowers, but it turns out the young leaves make a good addition to spring salads. This year I've planted some out in the forest garden. Here is one of the young plants getting settled in:


Primrose flowers, a lovely spring native, are another mild tasting and very pretty salad ingredient to brighten up those last wintry days in early spring.


Milky Bellflower sends up its leaves around April time and these can also be added to spring salads. The tall spires of large, bell shaped flowers that come later can make a pretty addition to summer salads, as well as looking great in the flower garden.


Sweet rocket (below) is used in the same way. This is a traditional cottage garden plant, which usually comes with heads of pink flowers, but here I have a white flowering variety.


Other edible flowers self seed around the place - we find plenty of calendula, the delicious nasturtiums and lovely, delicate tasting borage cropping up all over the the garden. I usually transplant them to a useful spot and weed the rest out.

And if that's not enough, I have various soft herbs that I often add for a little extra flavour. Two favourites are garlic chives for year round garlic flavour and sorrel, for a constant supply of zesty lemon tang.

If you're interested in any of these plants, here are their latin names, along with season of salading:

Lamb's Lettuce - Valerianella locusta - late autumn to early spring
Mountain Spinach - Atriplex hortensis - late spring to early autumn
Wild Rocket - Diplotaxis tenuifolia - late winter to late autumn
Columbine - Aquelegia vulgaris - spring
Primrose - Primula vulgaris - late winter - spring
Milky Bellflower - Campanula lactiflora - early spring and summer
Sweet Rocket - Hesperis matronalis - early spring to late summer
Marigold - Calendula officinalis - late spring to autumn (or through winter in mild years)
Nasturtiums -Tropaeolums - summer to mid autumn
Borage - Borago officinalis - summer to late autumn (or into winter in mild years)
Garlic chives - Allium tuberosum - year round
Sorrel - Rumex acetosa - year round

Monday, 13 April 2015

Minerals and plants

I've been doing some research into minerals and plants. I want to make sure the soil I've revealed from under all that concrete is now capable of being as productive as possible and I've found out a few things about how vitally important minerals are in keeping plants healthy.

Some key elements are calcium, magnesium, sulphur and silicon:

Calcium (Ca) - this element is linked to the pH of your soil, with higher pH soils usually containing more calcium. Calcium in plants is used in cell walls. Calcium deficiencies tend to be caused by a disruption in the supply, rather than a shortage in the soil. Causes can be a shortage of water (calcium is carried in the water the plant draws up) or excessive use of potassium or magnesium fertilisers. Calcium deficiencies cause blossom end rot in tomatoes and bitter pit in apples. They can cause die back or burn marks on young leaves and they lead to a loss of apical dominance.
Magnesium (Mg) - essential component of chlorophyll production and as a result is important in gaining high photosynthesis ability. High photosynthesis ability is key in increasing plant health and ability to resist pest and disease attack and also in increasing drought resistance. A deficiency of Mg shows up as green veined leaves with yellow between the veins. Found on older leaves first. Easy to confuse with virus attack and natural aging. Can be a problem caused by waterlogging, lack of water and compacted soils. Can also be caused by too much potassium being added to the soil or plant.
Sulphur (S)  - helps the plant to form important enzymes and plant proteins. Deficiencies cause yellowing of leaves, with oldest and highest leaves yellowing first. It is rare to find a sulphur deficiency.

Other trace elements include boron, iron, manganese, molybdenum, sodium, copper and silicon.

Boron (B) deficiency is one of the most widespread micronutrient deficiencies around the world. Boron is found in cell membranes. It affects the stability of cell walls as well as the ability of plants to take up other nutrients. It is particularly important in flower and fruit development. It is also important for photosynthesis as it affects the ability of plants to transport sugars away from the site of photosynthesis to where they are needed - for plant growth, fruit development, root growth and as root excretions. Sugars need to keep moving like this in order for photosynthesis to continue. Boron is also used in the development of root nodules in nitrogen fixing plants. It is also used in protein synthesis. Deficiencies in boron lead to poor plant growth and loss of fertility. Only very small amounts of boron are needed by plants. Too much is actually toxic, so efforts to increase boron need to be very careful about it.


I've been looking at different ways of increasing mineral availability to plants, including the use of mineral accumulators (or dynamic accumulators), foliar feeds and general soil mangement.

Mineral accumulators are plants that draw up minerals from the soil, accumulating them within their leaves - elements such as magnesium, copper and iron. These minerals can be made available to other plants by using the cut leaves as a mulch or by adding them to compost.

Here is a list of some plants and the elements they accumulate, with elements listed in order with higher concentrations first and with elements of significantly high concentrations compared to other plants listed in bold type.


Key plants:

Fat Hen (Chenopodium album) K, P, Ca, (also a little Fe and Na). Has extremely high levels of K. Has very high levels of P and Ca.
Amaranth (Amaranthus spp) K, Ca, P, Mg, Na, Fe (also a little Cu). Has pretty high concentrations off all these elements (except the Cu), especially Ca and K. Mg and Na are also present in relatively very high concentrations compared to a lot of other plants.
Stinging Nettle (Urtica dioica) P, S, Ca, N, K, Mg, Si Cu and Mo (also a little B). All the elements listed in bold are in higher concentrations than a lot of known mineral accumulators. Mg is also in relatively high concentrations compared to other plants.
Dandelion (Taraxacum officinale) K, Ca, Na, Fe, P, S, Mg, B, Mn (also Cu). Has much higher concentrations than a lot of other plants of B and Fe. Also high concentrations of Na, K, Ca and Mn.
Red Clover (Trifolium pratense) Mg, Mn (also B and Cu). Significantly high concentrations of Mg and Mn.
Lambs Lettuce (Valerianella locusta) K, Ca, Fe, Mg, B (also Na, Mn, Cu and Mo). Particularly high levels of B - one of the highest on record. Also very high levels of Fe and quite high levels of K.

Other useful plants:

Yarrow (Achillea millefolium) K, Ca, Mg (also a little Na, Mn and Si).
Borage (Borago officinalis) K, Ca
Feverfew (Chrysanthemum parthenium) K, Ca, Mg (also a little Mn, Na and Si)
Chicory (Cichorium intybus) K, Ca, Mg, Na (also Fe)


Sometimes minerals are readily available in the soil, but something is stopping plants from being able to access them. Careful management can stop this from being a problem. For example:
  • Improve heavy soils to make their rich nutrients more availble - add organic matter. Potentially add lime (or calcified seaweed) to encourage large particles to break down into smaller ones.
  • Shortage of water in the soil reduces mineral uptake - maintain a steady water supply and/or add organic matter to the soil and a mulch on top to retain water in the soil for longer.
  • Root damage by pests, diseases or waterlogging may make a plant unable to take up the food it needs. Add organic matter to the soil to improve drainage.
  • Too much fertiliser or lime can make some nutrients unavailable to plants. Be careful to only add food supplements if they are needed.

Tuesday, 7 April 2015

Spring Natives

I've got a bit of a native plant obsession going on at the moment. Actually, it's been building over the last couple of years, ever since watching Monty Don's around the world in 80 gardens and seeing the beautiful home garden by Chilean architect Juan Grimm, in which he uses native Chilean plants, planted just as they would grow in their natural environment - so it looks as though his house has been airlifted into a lovely, lush, wild and beautiful space.

So I've set myself the task of planting out my new back garden space entirely with native plants, to recreate the feel of our local native environment - those parts that are suited to a lawned back garden with a few trees and shrubs - country hedgerows with flower filled verges and the woodland edge. This area of the garden isn't very well developed yet, but nevertheless, this spring, there are all sorts of lovely native plants popping up and delighting me - one flowering now that I've only ever seen in photos before.

This is a wild tulip, native to the UK.


Having seen this flower open now for the first time, I can't believe I've not seen them around more often. I had to source the bulbs online as they aren't stocked in garden centres or in most plant nurseries. The flowers are beautiful right from the elegant flower bud stage. They're perhaps marginally more petite than cultivated tulips and the leaves are narrower. The flowers are flushed with green on the outside of the petals and are a rich spring yellow inside. Wonderful.

Elsewhere, I have some more familiar spring faces. Grape hyacinth pictured below, I have nestled beneath my silver birch tree.


Lungwort looks really bright planted here amongst the ivy

 Our native wood spurge is another good one for a shady spot. I'm looking forward to getting a decent spread of these - I love the colour combination of bright zesty green with the dark blue-green leaf.


Periwinkle is another shade lover and is great for ground cover. I found this lovely white flowering version in a local nursery and am trying to make more plants by allowing it to layer in to the ground, creating roots where it touches that can eventually be cut away to give me more plants. The stems can be used in basketry and I'm really keen to have a go once I've grown enough to spare a bit.


And I've planted loads of my all time favourite flower, the snakeshead fritillary.I just love the chequerboard pattern on the petals and the unusual, slightly boxy shape to those gently nodding heads. It comes in this pink colour and more rarely, it throws up white flowering versions with a white and off white chequerboard pattern. Very striking.


Wednesday, 17 December 2014

Plant Led Soil Improvement

We didn't find brilliant soil when we stripped up the concrete. It was pretty heavy clay and pretty well compacted too - especially after being driven over with heavy machinery several times. So in order to fulfill my dreams of a highly productive forest garden, some soil improvement was definitely in order. And me being me, I searched for ways to achieve this using plants.

I found inspiration from two main places. Firstly Martin Crawford's fantastic book 'Creating a Forest Garden', where he talks about dealing with compacted soil by growing deep rooting ground covers. Equipped with the useful information he gave, I hunted down seed mixes on the internet and discovered Cotswold Seeds' Humus Builder. This includes deep rooting and fast growing plants - Cocksfoot grass, red clover and chicory - which can be cut down several times a year in order to add humus to the soil, while their roots work down and through the soil, improving structure. So this got added in the spring of 2013 and has been growing well ever since alongside several species of self seeded plant.

And then I read what has become a very influential book - Teaming With Microbes, by Jeff Lowenfels and Wayne Lewis. This book describes soil food webs in detail and explains how not only are they crucial in providing plants with the nutrients they need, but also how they differ for different types of plant. And then the book describes how you can enhance your own soil food webs or - more relevantly to me - nudge them in the direction they need to be for the types of plant you want to grow. Basically forest soils have different combinations of microorganisms in them to flower beds and it's these specific combinations of microorganisms that provide an appropriately balanced diet for plants in natural perennial systems. Nurture a healthy and appropriate soil food web and your plants will thrive. So if I want to grow a forest garden, my soil doesn't only need more humus and better drainage, it needs a decent set of microorganisms and this means I get to use a favourite technique - Permaculture Principle 10 - use and value diversity.

The way to do this is to think logically - in a forest, the soil food web is fed by falling leaves and branches - this encourages fungi to dominate at the smallest of levels and fungi are great at providing the right kind of food for trees and shrubs. In flower beds, lawns or vegetable gardens, it's a different picture - you get more green materials falling - it's the bacteria that love this and so thrive here, providing nitrogen in a different format to fungi, and one that is appropriate for the less woody plants.

So with this in mind, I need to start dropping more brown and woody materials onto my forest garden area, not just the green humus building plants from my soil improving seed mix.

At the moment, I have two strategies for this -

1. I've planted lots of broom plants - they grow fairly quickly and can be trimmed to provide woody materials to leave lying around on the ground. They also, of course, provide nitrogen, which my trees and shrubs and any other plants going in here will need to grow quickly. So double hit from the broom - just the kind of plant I like.

2. I've also put to use as a mulch the huge mountain of trimmings I got from pruning ivy and virginia creeper from a barn roof this autumn. I've laid it in the specific areas where I intend to plant trees and shrubs. Hopefully they'll act as little nurseries for all the kinds of soil organisms I need in a forest system, helping to nudge things in the direction I need in advance of getting those trees and shrubs planted out this winter.

I would love to record the impact of this and put to use some of the environmental monitoring techniques I learned while at uni. Wouldn't it be great to map how the soil food web changes over time. If I find the time to do this, I will of course keep you updated.

Perennial Runner Beans - Year 2

So last year I planted out my runner beans, the variety chosen specifically to try and keep them alive through the winter. And this year, to my delight, when I peeled back the straw mulch I'd wrapped them up in last autumn, they were still alive!

They grew a little later in the year than I'd expected, having heard that they come up early if grown year after year. First sighting was probably around may-june time. And then they grew and grew and grew. Each plant threw up several stems, meaning we got a really good crop.

I've collected seeds from this batch, which I'll sow next year so that I can set up a second runner bean patch to cross pollinate with this first patch. Not all of my original plants made it through the winter, so these seeds are saved from the strongest of the lot. I'll do the same with the next sowing next year - save seeds from the strongest plants, to give me a third generation of hardy runner bean seeds. The plan from there is to simply save seed each year from the plant survivors and to grow new plants from these seeds each year to replace any that die out. I'm hoping to generate some really hardy runner bean seeds that consistently grow strongly after being left in the ground over winter.

From a permaculture point of view, I'm mainly using Principle 10 here - 'use and value diversity'. What I'm doing means I get my favourite beans without having to dig up the soil, disturbing the delicate and diverse soil food webs that naturally provide my plants with the nutrients they need. It also means I can establish a long term polyculture of perennial vegetables and self seeded annuals around those runner beans - this year I've been growing kailaan (a short lived perennial stem broccoli), red orache, calendula and siberian purslane. This diversity of crops means I get a higher yield of produce from my runner bean bed than I would using traditional techniques.

And it's all a lot less work!

Just got to persuade the kids that runner beans are as tasty to them as they are to me.

Saturday, 28 December 2013

Salad Leaves in a Perennial Polyculture

I've been growing a number of plants alongside my runner beans this year as the beginnings of my intended perennial vegetable garden.

The star attraction was a perennial salad plant - siberian purslane. The theory is that this is easily grown from seed, enjoys a shady spot with any type of soil and tastes nice and mild, so can make up a bulk salad ingredient. Year round. It is also said to make good ground cover and so should be very useful as a weed suppressant. I was understandably very excited to give this one a go. I ordered my seeds and once they arrived, eagerly skipped off down the garden to gently scatter them in their spot - two neat rows of seed sown between my rows of runner beans.  And then I waited and waited. And waited a bit more.

Eventually a few plants poked their little heads up. Well I'm happy if I get just a few - they're said to self seed readily, so they should spread around in time. I carefully nurtured these little plants, regularly clearing away any weeds, giving them a grass clipping mulch from time to time.

I waited until summer, when they were a good size before trying my first taste. What a wonder to have my first perennial, year round bulk salad plant! I was starting to feel rather chuffed with myself. Perhaps this plant alone marked the point where I'd made it as a permaculture gardener. If my garden grows nothing else, from now on, I can always have salad. Polyculture, weed supressing salad. Multifunctional salad no less.

It tasted vile.

Bummer.

The marigolds looked great though in amongst this disappointing polyculture. They'd self seeded in along with some lovely chamomile plants and some red orache. I got salad leaves from that at least, even if its season isn't all that long. And wild orache also turned up. So annual plants made a good appearance and cheered up the whole bed rather nicely.

 And then I read that siberian purslane is a good salad plant all year round, except in summer, when it tastes rather bitter. Aha! Thank goodness for that! I must get back out there and try it again actually. I've not had the guts to do it again since that fateful day. So perhaps this really is the beginnings of my first perennial polyculture, with a few edible annuals thrown in for good measure.

LinkWithin

Related Posts with Thumbnails